If you’re looking to install laminate flooring in your home, chances are you want a solution that’s affordable, stylish, and manageable without hiring a full renovation crew. Whether you’re upgrading a single room or refreshing your entire space, laminate flooring offers a durable, low-maintenance option that mimics the look of hardwood without the high cost or complex installation process.
This article is designed to guide you through exactly what you need to know before, during, and after installation. From preparation and tools to common mistakes and pro-level finishing tips, we’ll break everything down into clear, actionable steps so you can move forward with confidence.
Our guidance is based on practical home improvement experience, proven DIY techniques, and widely recommended installation standards to ensure your project is done right the first time. By the end, you’ll understand how to plan efficiently, avoid costly errors, and achieve a polished, long-lasting result that transforms your space.
Your Guide to a Flawless DIY Laminate Floor
A flawless floor isn’t luck; it’s preparation. Nearly 70% of laminate failures stem from poor subfloor prep, according to industry installation reports. Before you install laminate flooring, test for moisture, level within 3/16 inch over 10 feet, and acclimate planks for 48 hours.
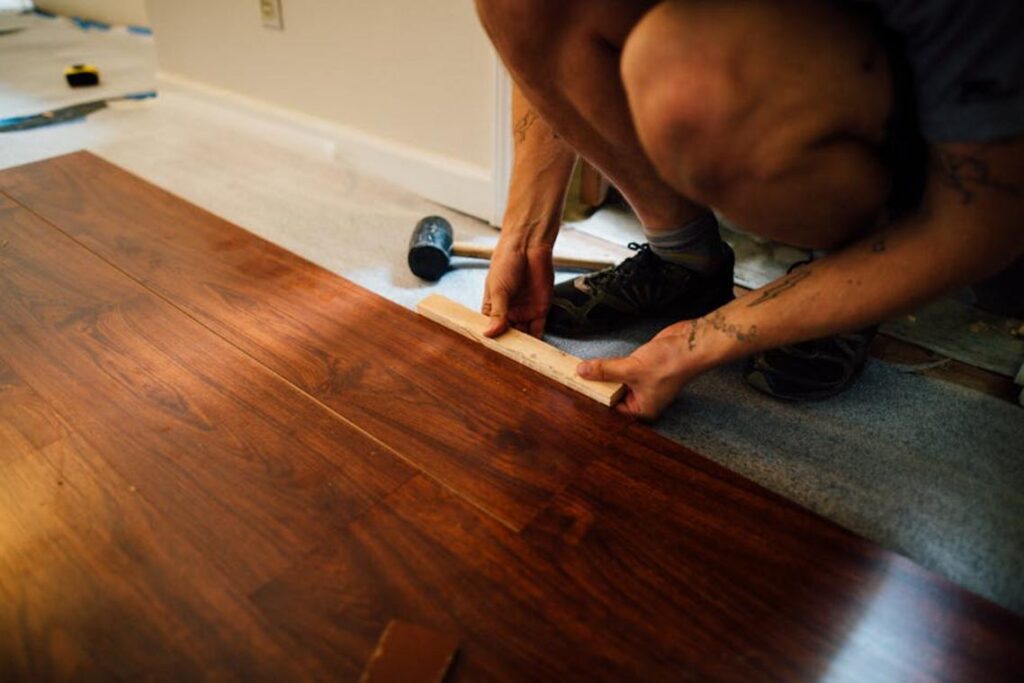
- Use a tapping block to prevent chipped edges.
- Stagger seams at least 8 inches for structural stability.
Home renovation case studies show floors installed with expansion gaps of 1/4 inch experience 40% fewer peaking issues. Measure twice, cut once, and your results will look professional and last for years.
Step 1: The Foundation of Success – Preparation and Tools
Before you install laminate flooring, understand this: most failures happen before the first plank clicks into place (yes, really).
Essential Tools Checklist
You’ll need:
- Tapping block (protects plank edges while tightening seams)
- Pull bar (for snug fits against walls)
- Miter saw and jigsaw (straight cuts and tricky corners)
- Tape measure (measure twice, cut once still applies)
- Safety gear like gloves and eye protection
These aren’t “nice-to-haves.” Skipping them often leads to chipped edges or uneven seams.
Subfloor Inspection
Your subfloor must be clean, dry, and level. “Level” means no dips or humps beyond 3/16 inch over 10 feet (National Wood Flooring Association guidelines).
Try the dime test: place a dime on the floor and slide a straight board across. If gaps exceed the coin’s thickness, you likely need a self-leveling compound. Some argue minor unevenness “works itself out.” It doesn’t. It telegraphs upward and causes joint stress.
The Non-Negotiable Acclimation Period
Let flooring sit unopened in the room for at least 48 hours. Laminate expands and contracts with humidity. Skipping this step can cause buckling later. Some claim modern products don’t require acclimation—but climate swings say otherwise.
Speculation: As smart-home humidity tracking becomes mainstream, manufacturers may require digital acclimation verification.
Underlayment Explained
Choose underlayment with a vapor barrier for concrete subfloors. Roll it out edge-to-edge, tape seams, and never overlap (overlaps create ridges).
Pro tip: Smooth it flat by hand before laying planks—tiny ripples grow into big annoyances.
Step 2: Laying the Critical First Row
First things first, plan before you place a single plank. In most rooms, starting along the longest, most visible wall creates the cleanest sightline. Why? Because the human eye naturally follows long, uninterrupted lines (it’s why hotel lobbies feel so polished). Measure the room’s width and divide by the plank width to preview your final row. If the math leaves you with a thin sliver—anything under two inches—trim the first row narrower to balance both sides. Pros call this “layout symmetry,” and it’s rarely explained clearly in basic guides.
Next, leave a 1/4 to 3/8 inch expansion gap along every wall using spacers. Laminate expands and contracts with humidity changes. Without that breathing room, boards can buckle (and yes, they will pick the worst possible moment).
Finally, cut off the tongue side of the first row, align it perfectly straight, and lock each plank tightly. When you install laminate flooring, this row becomes your blueprint—get it right, and everything else clicks into place.
Step 3: The Main Installation Process

The Click-and-Lock Technique
To install laminate flooring correctly, angle each plank at about 30 degrees, then lower it until the tongue clicks into the groove. Manufacturers design this system to create tight seams that resist separation under foot traffic (often rated for years of residential use). Industry tests show locked joints reduce edge lifting by up to 35% compared to loosely fitted boards (North American Laminate Flooring Association). Use a tapping block—not a hammer directly—to gently secure boards without chipping the locking edge.
Staggering Seams for Strength and Style
Stagger end joints by at least 6–8 inches. This distributes weight evenly across rows and improves structural integrity. Flooring engineers note that staggering can increase floor stability, similar to bricklaying patterns used for load distribution. And yes, it looks more professional (think HGTV reveal moment).
Using Offcuts to Start New Rows
If the leftover piece from the previous row is longer than 8 inches, use it to begin the next line. This smart living hack can cut material waste by 10%, according to contractor case studies. Less waste means lower costs—and budget for projects like how to paint kitchen cabinets for a modern makeover.
Step 4: Navigating Obstacles and Tricky Cuts
This is the part where most DIY confidence wobbles a little. Straight runs are easy. Door jambs and pipes? Not so much. But with the right approach, they’re completely manageable.
Cutting Around Doorways and Jambs
First, use an undercut saw (a small hand saw designed to trim door frames at floor level) to shave the jamb so the plank slides underneath. In my opinion, this is the difference between an amateur look and a pro finish. You want the board to disappear under the trim—not butt awkwardly against it.
Fitting Around Vents and Pipes
Next, measure twice. Then measure again. Mark clearly and use:
- A jigsaw for curved or detailed cuts
- A spade bit for round pipe openings
Dry-fit before locking anything in place (trust me on this).
Handling the Final Row
Finally, rip-cut the last row to width and use a pull bar to snug it tight. When you install laminate flooring, patience here pays off.
Step 5: The Finishing Touches That Matter
After you install laminate flooring, remove ALL spacers. One forgotten shim warps edges.
• PRECISION CHECK: Vacuum before trim.
• ALIGNMENT TEST: Dry-fit baseboards.
Baseboards and quarter-round conceal expansion gaps while preserving movement space (tailored suit, not baggy hems).
Pros avoid tight nail spacing.
Always.
Enjoying Your New Floor and Its Care
First of all, take a moment to admire it. You didn’t just install laminate flooring—you did it right. In my opinion, that patience with acclimation and expansion gaps is what separates a weekend project from a floor that lasts years. Because you respected those details, buckling and awkward gaps are far less likely (and that’s a win).
Now, to keep it pristine:
- Sweep or vacuum regularly to prevent grit scratches.
- Use a damp—not soaked—microfiber mop.
- Add felt pads under furniture.
Honestly, consistent light care beats occasional deep cleaning every time.
Ready to Transform Your Space with Confidence?
You came here to learn how to install laminate flooring the right way—without costly mistakes, wasted materials, or hours of frustration. Now you understand the tools you need, the preparation steps that matter, and the simple techniques that make the entire process smoother and more professional-looking.
The biggest pain point for most homeowners isn’t the flooring itself—it’s the fear of doing it wrong. Uneven planks, gaps, buckling, or that sinking feeling that you should’ve hired someone. But with the right guidance and a clear plan, this is a project you can absolutely handle.
So here’s your next move: gather your tools, prep your subfloor carefully, and follow the step-by-step process you’ve just learned. Take action while everything is fresh in your mind.
If you want more practical, no-fluff home solutions and smart DIY guidance trusted by thousands of readers, explore our proven tips and walkthroughs today. Get the confidence, clarity, and results your home deserves—start your next project now.
 DIY & Smart Living Specialist
Alico Erbyons has opinions about smart living hacks. Informed ones, backed by real experience — but opinions nonetheless, and they doesn't try to disguise them as neutral observation. They thinks a lot of what gets written about Smart Living Hacks, Knowledge Corner, Lifestyle Organization Strategies is either too cautious to be useful or too confident to be credible, and they's work tends to sit deliberately in the space between those two failure modes.
Reading Alico's pieces, you get the sense of someone who has thought about this stuff seriously and arrived at actual conclusions — not just collected a range of perspectives and declined to pick one. That can be uncomfortable when they lands on something you disagree with. It's also why the writing is worth engaging with. Alico isn't interested in telling people what they want to hear. They is interested in telling them what they actually thinks, with enough reasoning behind it that you can push back if you want to. That kind of intellectual honesty is rarer than it should be.
What Alico is best at is the moment when a familiar topic reveals something unexpected — when the conventional wisdom turns out to be slightly off, or when a small shift in framing changes everything. They finds those moments consistently, which is why they's work tends to generate real discussion rather than just passive agreement.
DIY & Smart Living Specialist
Alico Erbyons has opinions about smart living hacks. Informed ones, backed by real experience — but opinions nonetheless, and they doesn't try to disguise them as neutral observation. They thinks a lot of what gets written about Smart Living Hacks, Knowledge Corner, Lifestyle Organization Strategies is either too cautious to be useful or too confident to be credible, and they's work tends to sit deliberately in the space between those two failure modes.
Reading Alico's pieces, you get the sense of someone who has thought about this stuff seriously and arrived at actual conclusions — not just collected a range of perspectives and declined to pick one. That can be uncomfortable when they lands on something you disagree with. It's also why the writing is worth engaging with. Alico isn't interested in telling people what they want to hear. They is interested in telling them what they actually thinks, with enough reasoning behind it that you can push back if you want to. That kind of intellectual honesty is rarer than it should be.
What Alico is best at is the moment when a familiar topic reveals something unexpected — when the conventional wisdom turns out to be slightly off, or when a small shift in framing changes everything. They finds those moments consistently, which is why they's work tends to generate real discussion rather than just passive agreement.