Ready to transform your space with a flawless tile bathroom wall? This step-by-step guide walks you through the entire process—from careful surface preparation to the final seal—so you can achieve a polished, professional look without hiring a contractor. Tiling may seem intimidating at first, but with clear instructions and the right tools, it’s a manageable DIY project that delivers stunning, long-lasting results. We focus on the practical details that matter most, helping you avoid common mistakes and ensure a durable, waterproof finish that elevates your bathroom with confidence.
Before You Begin: Your Tools and Materials Checklist
First things first—gather everything before you touch that tile bathroom wall. As one contractor told me, “Half the battle is not running back to the hardware store mid-project.” Fair point.
Essential Tools:
- Notched trowel (size depends on tile—see tip below)
- Level
- Tape measure
- Tile cutter or wet saw
- Buckets
- Sponges
- Grout float
- Safety gear (gloves, safety glasses)
Next, let’s talk supplies.
Required Materials:
- Tiles (buy 10% extra for cuts and mistakes)
- Thin-set mortar
- Grout
- Tile spacers
- Cement backer board or waterproofing membrane (for wet areas)
Now, about that trowel. Beginners often ask, “Does size really matter?” Yes. Larger tiles need deeper notches (like 1/4″ x 3/8″) to ensure proper adhesion, while small tiles use smaller notches. Check manufacturer guidelines to be safe. For more prep guidance, see this helpful DIY renovation checklist.
The Foundation of Success: Prepping Your Bathroom Wall
Before you even think about laying tile, start with a clean slate. First, scrub the wall thoroughly to remove soap scum, mildew, and grime. A mixture of warm water and mild detergent usually works, but for stubborn buildup, a vinegar solution can help break it down. Once clean, inspect the surface closely. Fill small holes or cracks with patching compound, then sand smooth when dry. The goal is simple: a flat, even surface so your tiles don’t wobble (because they will show it).
Waterproofing Is Non-Negotiable
Next—and this is critical—install a waterproof barrier. In shower or tub surrounds, use cement backer board or apply a paint-on waterproof membrane. Without this layer, moisture can seep behind your tile bathroom wall, leading to mold growth and costly structural damage. In other words, skipping this step might save time today but cost you thousands later.
Finally, create your layout. Find the center of the wall by measuring its width and marking the midpoint. Then, use a level to draw vertical and horizontal reference lines. This ensures your pattern stays straight and balanced from the very first tile.
Applying the Adhesive: Mixing and Spreading Mortar
Getting mortar right is a bit like mixing cake batter—too runny and it slides, too thick and it won’t spread. First, gradually blend thin-set mortar with water until it reaches a smooth, peanut-butter-like consistency. It should hold its shape on the trowel without dripping (if it slumps, add a touch more powder; if it crumbles, a splash of water).
Next comes the two-step application process:
- Flat side first: Spread a thin, even coat onto a small section of the tile bathroom wall. Think of this as buttering toast—steady and smooth.
- Notched side second: Hold the trowel at a 45-degree angle and comb ridges into the mortar. These ridges act like tiny rails, helping tiles grip firmly.
However, work in sections you can finish within 15–20 minutes. Mortar dries like sun-baked mud—once it skins over, adhesion weakens.
For more renovation guidance, explore budget friendly bathroom renovation ideas that add value.
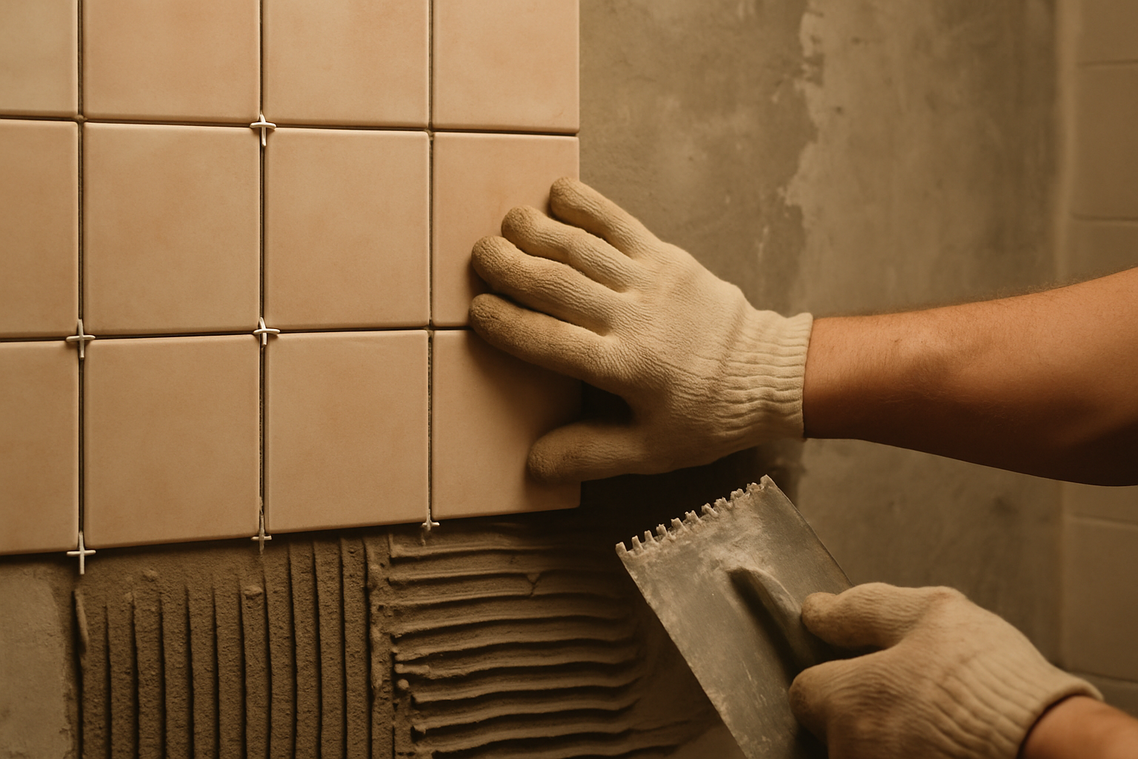
Placing Your Tiles Like a Pro
If you want a layout that looks intentional (not accidental), start at the center. Find where your vertical and horizontal layout lines intersect, then begin setting tiles there and work outward in four sections, or quadrants. A quadrant simply means one-fourth of your wall divided by those center lines. This keeps the design balanced so your cuts at the edges are even instead of awkward slivers.
When setting each tile, press it firmly into the mortar—the adhesive that bonds tile to the wall—with a slight twist. That twist helps collapse the ridges in the mortar for full coverage and stronger adhesion. Immediately place spacers between tiles. These small plastic pieces create uniform grout lines, which are the visible gaps later filled with grout.
For edge pieces, measure the gap carefully. Use a tile cutter for straight cuts. For curves around pipes or outlets, a wet saw or tile nippers give better control. (Measure twice. Seriously.)
As you build out your tile bathroom wall, regularly place a level across several tiles. This tool checks for flatness so you catch uneven spots early—before the mortar sets and fixes mistakes in place.
Wait at least 24 hours after setting the last tile before you even think about grouting. Mortar needs time to cure, which means harden and gain strength through chemical reaction (cement science is patient). Then, remove every spacer. Next, load grout onto a float and hold it at a 45-degree angle, pressing firmly into the joints. Honestly, this step makes or breaks a tile bathroom wall. Afterward, wipe diagonally with a damp sponge, rinsing often in clean water. Finally, once cured, apply sealer to block stains and moisture (think superhero shield). Pro tip: use light, consistent pressure throughout for durability.
Once you’ve mastered the art of tiling your bathroom wall, you might consider enhancing the space even further by checking out our article on ‘What Paint On Blinds Ththomideas‘ for some creative ideas on how to refresh the look of your window treatments.
Step Back and Admire Your Handiwork
You set out to transform your space, and now your tile bathroom wall stands as proof of what careful planning and steady effort can achieve. What once felt like a complex renovation is now a polished, durable feature you installed yourself.
By committing to thorough prep work, a clean layout, and precise finishing touches, you’ve created a surface that not only looks professional but will hold up beautifully for years. That lingering doubt about whether you could really pull it off? It’s gone.
Now, clean your tools, clear the dust, and take a moment to enjoy the upgrade. You didn’t just follow steps — you elevated your home.
 Head of Content & Lifestyle Strategist
Ask Williamen Glaseroller how they got into home solutions and fixes and you'll probably get a longer answer than you expected. The short version: Williamen started doing it, got genuinely hooked, and at some point realized they had accumulated enough hard-won knowledge that it would be a waste not to share it. So they started writing.
What makes Williamen worth reading is that they skips the obvious stuff. Nobody needs another surface-level take on Home Solutions and Fixes, Smart Living Hacks, Lifestyle Organization Strategies. What readers actually want is the nuance — the part that only becomes clear after you've made a few mistakes and figured out why. That's the territory Williamen operates in. The writing is direct, occasionally blunt, and always built around what's actually true rather than what sounds good in an article. They has little patience for filler, which means they's pieces tend to be denser with real information than the average post on the same subject.
Williamen doesn't write to impress anyone. They writes because they has things to say that they genuinely thinks people should hear. That motivation — basic as it sounds — produces something noticeably different from content written for clicks or word count. Readers pick up on it. The comments on Williamen's work tend to reflect that.
Head of Content & Lifestyle Strategist
Ask Williamen Glaseroller how they got into home solutions and fixes and you'll probably get a longer answer than you expected. The short version: Williamen started doing it, got genuinely hooked, and at some point realized they had accumulated enough hard-won knowledge that it would be a waste not to share it. So they started writing.
What makes Williamen worth reading is that they skips the obvious stuff. Nobody needs another surface-level take on Home Solutions and Fixes, Smart Living Hacks, Lifestyle Organization Strategies. What readers actually want is the nuance — the part that only becomes clear after you've made a few mistakes and figured out why. That's the territory Williamen operates in. The writing is direct, occasionally blunt, and always built around what's actually true rather than what sounds good in an article. They has little patience for filler, which means they's pieces tend to be denser with real information than the average post on the same subject.
Williamen doesn't write to impress anyone. They writes because they has things to say that they genuinely thinks people should hear. That motivation — basic as it sounds — produces something noticeably different from content written for clicks or word count. Readers pick up on it. The comments on Williamen's work tend to reflect that.