Ready to achieve a flawless floor without the frustration? This step-by-step guide will show you exactly how to install laminate flooring with confidence and precision. Many DIYers run into issues like buckling, gaps, or uneven boards—not because the job is too hard, but because they miss critical preparation and finishing details. Here, you’ll learn the complete process from start to finish, with clear explanations of both the “how” and the “why” behind each step. By the end, you’ll have the knowledge to avoid common mistakes and create a durable, professional-looking floor you can truly be proud of.
Before You Begin: Essential Preparation for a Perfect Finish
You know what’s frustrating? Spending an entire weekend laying planks, stepping back to admire your work—and spotting gaps, squeaks, or uneven seams. Most of those headaches happen before you even install laminate flooring.
Gather Your Toolkit (So You’re Not Mid-Project Rage-Googling)
Have these essentials ready:
- Tapping block – Protects plank edges while locking them together.
- Pull bar – Helps tighten boards near walls where a tapping block won’t fit.
- Spacers – Maintain the expansion gap (a small perimeter space that allows flooring to expand and contract).
- Miter saw – Makes clean, straight crosscuts.
- Jigsaw – Handles tricky cuts around vents or door frames.
- Safety glasses – Because sawdust in your eye is not a vibe.
Pro tip: Buy extra blades. Laminate dulls them fast.
Material Acclimation: The Step People Skip (And Regret)
Laminate expands and contracts with humidity changes. That’s why boxes must sit unopened in the room for 48–72 hours. Skipping this can cause buckling (planks pushing upward) or gaps later. According to the North American Laminate Flooring Association, acclimation helps prevent structural stress caused by environmental shifts.
Yes, waiting feels annoying. But replacing warped boards is worse.
Subfloor Inspection and Prep
A flat subfloor is the most critical factor for success.
- Sweep and vacuum thoroughly.
- Use a level and straightedge to check for uneven areas.
- Fill low spots with leveling compound and sand high spots down.
Even a 3/16-inch dip over 10 feet can cause flexing and joint failure (ask anyone who’s heard that dreaded clicking sound).
Underlayment Installation
Roll out underlayment edge to edge. Trim with a utility knife and tape seams securely.
Some types include a built-in moisture barrier—essential over concrete to block vapor. Without it, moisture can seep upward and damage planks.
Do it right now, and your future self won’t be muttering under their breath later.
Laying the Foundation: Mastering the First Three Rows
If you want your floor to look intentional (not accidental), the first three rows matter more than anything that follows. I always start by measuring the room’s width and dividing it by the plank width. If that math leaves you with a final row that’s less than two inches wide, rip the first row narrower on a table saw. It feels backward, but trust me—balanced edges look far more professional.
When you install laminate flooring, place the first plank with the tongue side facing the wall. Use 1/4- to 3/8-inch spacers to create an expansion gap (laminate expands with humidity—yes, even in climate-controlled homes).
Connecting the rest of the first row is straightforward:
- Angle the next plank into the groove
- Lower and tap gently with a tapping block
- Measure the final gap and cut the last plank to fit
Use that off-cut to begin the second row—just make sure seams are staggered at least 6–12 inches. Staggering strengthens the locking system and creates a natural flow (think brickwork, not a zipper).
Personally, I think symmetry is overrated in flooring. A slightly random pattern feels more organic and forgiving if walls aren’t perfectly square (and they rarely are). Pro tip: dry-lay the first three rows before locking everything tight.
Building Your Floor: Techniques for the Main Installation Area
The Angle and Tap Method
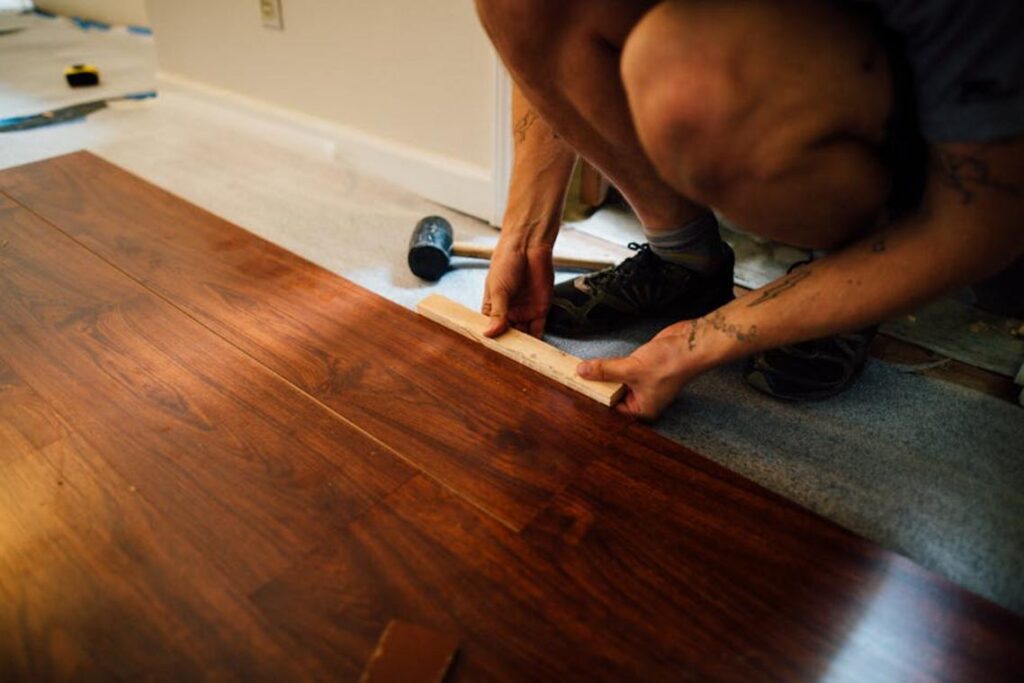
To install laminate flooring correctly, angle the long edge of the new plank into the previous row at roughly 20 degrees, then lower it until it clicks. That click signals the locking mechanism—grooved edges designed to snap together without glue—is engaged. Gently tap the short end with a tapping block to close the seam. Tight seams prevent gaps later (and gaps love to appear at the worst possible time).
Maintaining Consistency

Use spacers along every wall to preserve the expansion gap—typically 1/4 inch—to allow for seasonal movement. Wood-based boards expand and contract with humidity, even in climate-controlled homes. Constantly check for tight seams by running your hand across joints; if you feel a lip, fix it immediately. Some argue spacers are optional in small rooms. I disagree. Floors don’t care about square footage; physics wins every time.
Working Efficiently and Finishing Strong
Set up a cutting station outside the room to control dust and keep tools within reach. For the final row, measure the remaining width, subtract the expansion gap, and rip the planks lengthwise. There’s no room for a tapping block, so hook the pull bar over the edge and tap to lock it tight. Precision beats speed. If you’ve tackled projects like how to paint kitchen cabinets for a modern makeover, you know patience shows in the finish.
Finishing Like a Pro: Cutting Around Obstacles and Final Touches
So you’ve managed to install laminate flooring without gluing yourself to a plank—congrats. Now it’s time for the finesse work (the part that separates DIY champs from “eh, good enough”).
-
Navigating Doorways
Undercut door jambs so flooring slides underneath. Use a handsaw or oscillating tool laid flat against a scrap plank to match height. Cut slowly and test the fit. CLEAN. SEAMLESS. SATISFYING. -
Cutting for Vents and Pipes
Measure twice (yes, twice). Mark carefully, then use a jigsaw for vents or a spade bit for round pipe holes. Leave a slight expansion gap—floors like breathing room too. -
Installing Transitions
Secure T-molding or reducers where floors meet. They hide gaps and prevent stubbed toes (your pinky will thank you). -
Baseboards and Quarter-Round
Remove spacers, then nail trim to the WALL, not the floor. That gap? Hidden. That look? HGTV-level impressive.
Caring for Your New Floor: Maintenance and Longevity Tips
First, give your floor time to settle. Wait 24 hours before moving heavy furniture back in, after you install laminate flooring. This curing period helps planks lock and prevents shifting.
Next, clean smart. Use a microfiber mop and an approved laminate floor cleaner for routine care. Avoid steam mops, soaking the surface, or abrasive powders, which can warp or scratch the finish.
Finally, prevent damage before it starts. Add felt pads under chair legs, place doormats at entrances, and wipe spills. For example, a towel blot after a spill stops swelling.
Ready to Transform Your Space?
You came here wanting clarity on how to install laminate flooring the right way—without costly mistakes, uneven planks, or frustrating do-overs. Now you understand the tools, preparation steps, and techniques that make the difference between a stressful project and a smooth, satisfying upgrade.
The biggest pain point with flooring projects is simple: fear of getting it wrong. Wasted materials. Gaps that won’t close. Floors that don’t last. But with the right guidance and a clear plan, this is a project you can confidently tackle.
If you’re ready for a flawless finish, start by gathering your tools, measuring your space carefully, and following the step-by-step process outlined above. And if you want more practical, no-fluff home solutions trusted by thousands of DIYers, explore our proven guides and smart living hacks today.
Don’t let hesitation delay your upgrade. Take action now, apply what you’ve learned, and turn your space into something you’re proud of.
 Founder & CEO
Thalira Norvessa is the kind of writer who genuinely cannot publish something without checking it twice. Maybe three times. They came to daily digest through years of hands-on work rather than theory, which means the things they writes about — Daily Digest, Wuta DIY Renovation Techniques, Lifestyle Organization Strategies, among other areas — are things they has actually tested, questioned, and revised opinions on more than once.
That shows in the work. Thalira's pieces tend to go a level deeper than most. Not in a way that becomes unreadable, but in a way that makes you realize you'd been missing something important. They has a habit of finding the detail that everybody else glosses over and making it the center of the story — which sounds simple, but takes a rare combination of curiosity and patience to pull off consistently. The writing never feels rushed. It feels like someone who sat with the subject long enough to actually understand it.
Outside of specific topics, what Thalira cares about most is whether the reader walks away with something useful. Not impressed. Not entertained. Useful. That's a harder bar to clear than it sounds, and they clears it more often than not — which is why readers tend to remember Thalira's articles long after they've forgotten the headline.
Founder & CEO
Thalira Norvessa is the kind of writer who genuinely cannot publish something without checking it twice. Maybe three times. They came to daily digest through years of hands-on work rather than theory, which means the things they writes about — Daily Digest, Wuta DIY Renovation Techniques, Lifestyle Organization Strategies, among other areas — are things they has actually tested, questioned, and revised opinions on more than once.
That shows in the work. Thalira's pieces tend to go a level deeper than most. Not in a way that becomes unreadable, but in a way that makes you realize you'd been missing something important. They has a habit of finding the detail that everybody else glosses over and making it the center of the story — which sounds simple, but takes a rare combination of curiosity and patience to pull off consistently. The writing never feels rushed. It feels like someone who sat with the subject long enough to actually understand it.
Outside of specific topics, what Thalira cares about most is whether the reader walks away with something useful. Not impressed. Not entertained. Useful. That's a harder bar to clear than it sounds, and they clears it more often than not — which is why readers tend to remember Thalira's articles long after they've forgotten the headline.